
I love PicMonkey and I use it every day, in every blog post I write. I have been asked a few times how I have created a few of my pictures. So I thought I would share a few tricks with you all.

PicMonkey
1. Spot colour on a black & white photo
-

PicMonkey
The first thing you have to do is make the picture black and white.
- Then click on the paintbrush icon. Hover over your image and see how big the brush is compare the the area you wish to change back to colour. If you need a different size brush, just change the size. Then you are ready to start erasing the black and white.
- Go to the image, it might help to focus in on the area you want to change. Look in the bottom right hand corner of your screen and increase the percentage. This will make it easier to see what you are rubbing out. If you make a mistake, click the paintbrush again and it will fill in what you have just erased.
- Change the % back so you can see your whole image and there you have it, a black and white image with spot colour.

PicMonkey
2. Erasing things from photos
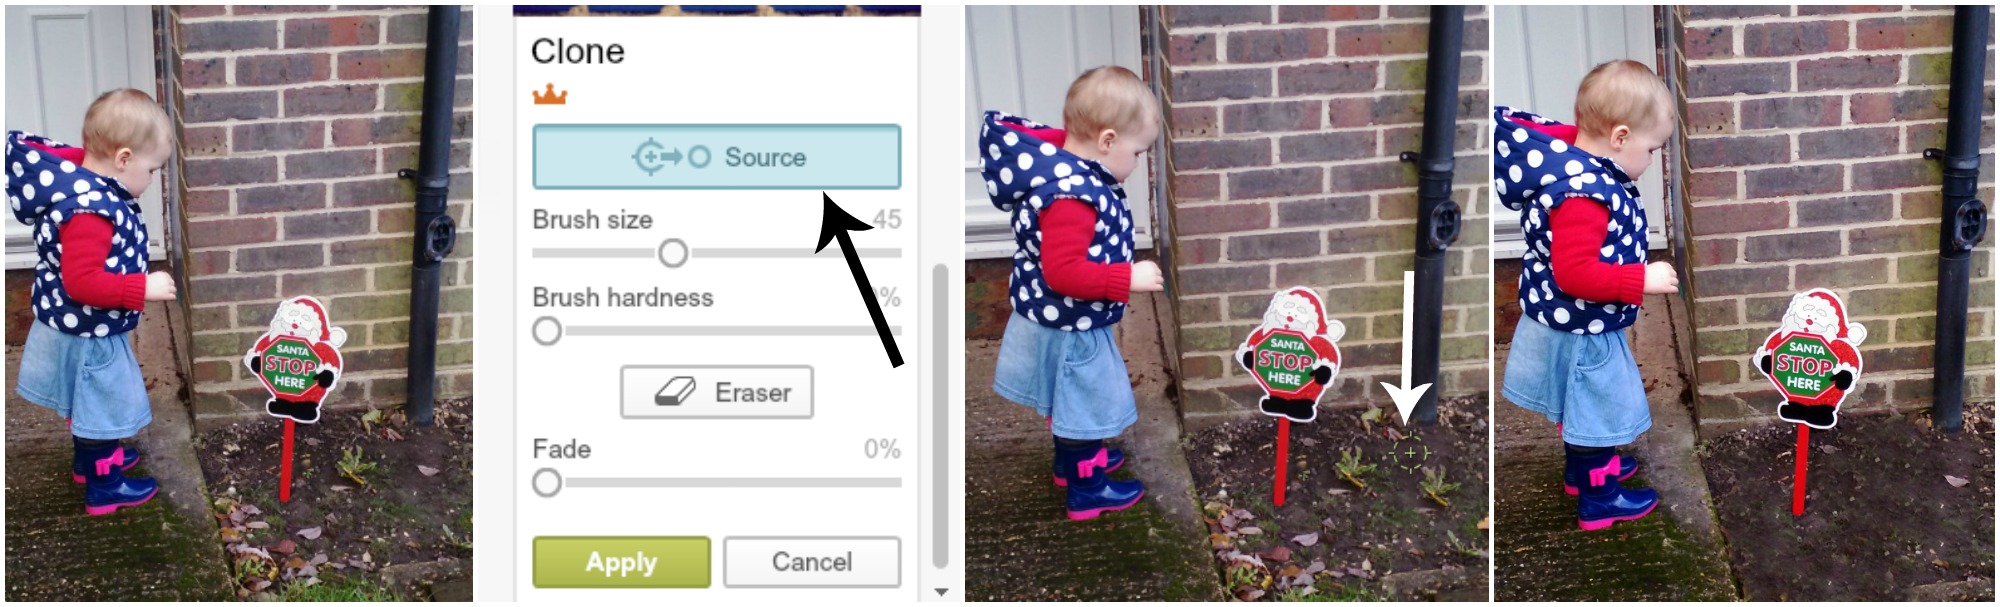
We have all done it, taken a really great picture then noticed something undesirable in the shot that is difficult to cut out. Here is where the Clone tool comes in so useful.
PicMonkey
- Select the Clone tool (the last option in the effects menu) under Advanced.
- Check the brush size you need by hovering over the image.
- Click source & then take your circular brush to an area you want to superimpose on the duff section (you can see this green circle just under my white arrow). Click to select this ‘good’ area.
- Then click on the area you wish to remove.
- Repeat clicking the source and dropping it on the area you want to change.
- Click Apply and my weeds disappear!
3. Colour matching
- Click Edit and upload the image that you want to match from (your desired colour).
- Go to Overlays (Butterfly)
- Add any shape
- Click on Colour 2 then click the pipette icon.
- Drag the pipette to the colour your desired colour. The shape will change colour.
- Click on Colour 2 again and you will now see the HEX code for that shade to the left of the pipette.
- Copy and paste it somewhere safe.
- Repeat the process for all the colours you want to match to.
- Then when you need a shade, just paste the HEX code into the box and the colour match will appear.

PicMonkey
4. Making a picture circular
- Open the picture that you want to edit.
- Crop the picture, a true square will give you a better circle.
- Then select Frames and look for a frame that you like and that gives you an option for corner radius.
- Increase the radius as far as it will go.
- Tick the box for transparent corners.
- Save your new round image!

PicMonkey
5. Curving words
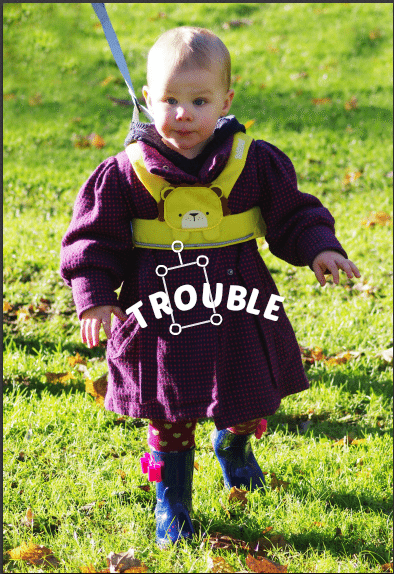
Curving words is not very technical, but it might be something that is not immediately obvious. Photoshop curves the whole word for you, and so you might spend time looking for a function to do that on PicMonkey (there isn’t one). However, this doesn’t mean you can’t curve words.
- Go to Edit and load the image you would like your text on.
- Select the text option and click. It will launch the box to type in.
- Type the first letter of your word only. Resize the box snugly around your letter.
- Then repeat opening a next text box and popping in one letter at a time.
- When you click on a letter you will see a circle on a line coming out of the top pf the box. Use this to change the angle of each letter to create a curved word.
- Save!
PicMonkey
6. Lighten & Brighten
I do this to almost all of my photos. Especially the ones we take indoors, as the natural light in our house is very poor.
- To Lighten open the image, then click the little wand (effects).
- Scroll down to last section and click on Curves.
- You will see a diagonal line, click on it and drag it toward the top left (a bit at a time) to see how it lightens your image.
- If your picture goes a bit yellowy increase the colour overide.
- Click Apply when you are happy.
- To Brighten in the same menu there is a Boost option.
- Select and increase the colour until you are happy.
- Click Apply and save your new light/bright image.
7. Removing the background
This can be quite time consuming, but it can be quite a useful thing to do.
- Open a blank Design.
- Then select Overlay.
- Choose Your Own and pick the image you want to remove the background from.
- Drag the edges out to enlarge, then click eraser on the overlay box.
- Increase eraser size and then start rubbing out the background.
- Vary the size of the image and the brush to get right into all the edges.
- When you are happy go to the square option right at the top of the main menu.
- Open Canvas and click make canvas transparent.
- Then you can use this image as an overlay on a new image.
- Just open the image (in Edit a picture), select overlay, your own, pick it and move it to an appropriate place on your new canvas.
I used this technique on our recent Mark Warner post.

PicMonkey
Do you use PicMonkey or do you prefer another piece of software?

Blog Club

The Mad Mid Week Blog Hop

Brilliant blog posts
Comments 59
I am annoyed I’ve scrapped my dark piccies now I never knew about the curve thingy! I am so trying this next time. Thank you for the fabbo tips, lovely xxx
Author
So glad it was helpful hun. Curves is fab 🙂 xxx
I love Picmonkey and I will defo be using that clone tool for editing out stuff now!! So clever thanks Aby! x
Author
My pleasure huni. x
I am a picmonkey fan but never upgraded to the paid for version. I found a way round most things though. So I use paint for clone or save a section I want to use as a separate picture then import it.
Author
Oh you are clever, I just pay the $4 so I don’t have to be creative 😉 x
I use pic monkey occasionally your tips are brill will defo be trying some out! x
I don’t often use PicMonkey – I tend to use Aperture to edit my photos and sometimes GIMP too for adding text or cloning areas. Whilst I have GIMP installed on my laptop, I only have Aperture available on my Mac at home so knowing more about these features on PicMonkey is useful if I want to be able to quickly edit photos when away from home – thank you for sharing.
These are great tips! I have only really used PicMonkey to crop, rotate and add text, nothing too fancy. I’ll be using it more now x
Author
Thanks hun, hope it will help x
Why does the round Mad Mid Week Blog Hop circle have a white frame around it? Can you get rid of it using Picmonkey? I’ve seen other websites with circular images with no white frames.
Author
This is just the way it has been saved as an image before it was made into a badge. If you follow the instructions for making a picture round, it should work, but then you would have to still ensure the badge linked to Superbusy Mum’s blog. x
Wow Aby!! I’ve been using PicMonkey for aaaaages and I didn’t know how to do half this stuff – that last one in particular BLEW MY MIND!!! Great tips xxx
Author
Thank you darling! You would think I had too much time on my hands wouldn’t you! 😉 xxx
Amazing post!!! I do a lot of this stuff (adding text, making circular photos, altering the colour of photos) using Powerpoint. You can mess around with photos a lot on a Powerpoint slide, and then save a combination of everything on the slide as a photo. Hey presto, you have a photo with text. However, I can’t spot colour on black and white photos and I can’t erase the background of a photo on Powerpoint, which are techniques you’d think you’d need Photoshop for. Thanks so much for sharing this (o:
Author
Thank you. Hope it helps x
These are great tips! I love picmonkey but am still a bit of a novice… thanks for this, my problem is how much time I waste faffing around on it! Serious distraction! x
Author
I hope they help, yes super time consuming if you let it x
Thanks so much for this post. I’ve only just started using Pic Monkey and it’s great. x
Author
Glad it is useful x
Excellent tips, thanks, usually I get my other half to sort the photos (he loves photography and uses Photoshop) maybe I’ll do some myself now, and shock him 🙂
Author
Oh I would stick with the other half, never turn down free labour! 😉 x
Gosh what an incredibly useful post – thank you so much! I’ve been using pic monkey for my posts for so long but didn’t know how to do half of these things!
Author
Ah thank you huni, I am so glad it is helpful x
Such fab tips thanks!
Such a helpful post, can’t wait to try them out! Thanks for sharing 🙂
Author
Glad they help x
Really fab tips lovely!! A couple I didn’t know there so very useful indeed xxx
Author
Thank you huni, glad they helped xxx
I just started using PicMonkey and I love it – but now I can love it more!
Thanks and have a great holiday.
#TheList
Author
Have fun with your pictures! 🙂 x
I had never even heard of pic monkey *hangs head in shame* but have now downloaded and will be using some of these tips! x
Author
Don’t talk to me just go and get it now! 😉 xx
Excellent tips, very helpful! Thank you #Thelist
Author
Glad they help x
This is fab – yet another of your posts I have bookmarked. Thank you! I use picmonkey and love it, but there is so much here I either hadn’t even thought of, or had but didn’t know how! #thelist
Author
Thanks! I am so glad they you are finding the post useful x
Fab tips, we have Photo shop so don’t use this but it’s something I’m going to download! Thanks for linking up to #brilliantblogposts. Happy holidays x
Author
Thanks hun. For me it is so much easier than Photoshop, I like simple things! 🙂 Have a wonderful Christmas x
I love picmonkey but I’ve not used half the things you’ve mentioned here. I don’t have Royale though, but in the new year might debate it. Great tips
Author
I think Royale is great and for the couple of dollars it is I think it is great value x
Love it! Great tips, will deifnitely use some of these x
I’ve only started using picmonkey last week, so this is very handy. Thanks for sharing!
#thelist
What a great post, I might have to give picmonkey a try =)
Author
You should it is super easy! x
I use picmonkey all the time, but there were a couple of things here that I didn’t know how to do, thank you!!
Author
Glad there was something in there for you. Happy Christmas x
This is brill, thank you xx
Author
My pleasure, glad it helps xx
I had no idea PM could do this. Amazing. I have yet to get my head round it as I use Canva A LOT! Ha ha. But I really need to get my PM on! Thanks gorgeous lady, another amazing post on blogging. #BloggingGuru xxxxx
Author
It can do so much, I will write part two sometime! 🙂 Thank you huni xxxx
Fantastic post! I use PicMonkey but didn’t know about these tricks, will deffo be using them more, especially the ‘clone’ tool. Thanks!
Author
Thank you! SO glad they are helpful tips x
Fab tips here 🙂
Author
Hope they help x
Pingback: 5 Top Pinterest Tips for Bloggers
These are great tips, I’m considering upgrading, I have only used the free version so far.
Author
I think it is worth the money as it isn’t much x
Ahhh I’ve only just found this post it’s fab thanks so much 🙂