

Are you interested in starting a blog? Maybe your friend blogs or you’re an avid reader of blogs. Maybe you want to make money or to reach people with your message. Whatever the driving force, there’s no doubt that creating a blog can change your life.
That’s why I thought I would create an easy to follow, step-by-step guide showing you how to start a blog is a quick and easy way.
Why you should start a blog
Maybe you’re on the fence. Wondering if you want it enough to warrant the time you’re about to invest? I want to share why I think you should create a blog.
- You can make exceptional friends not bound by location, but by interests, goals and ambition. Factors that help you find amazing friends.
- Blogging is the number one way to market your products or ideas and get your message out to your perfect audience.
- You can use it to make money.
- You can also use it as a springboard to other things such writing opportunities or speaking gigs.
Ready to get stuck in? O.k, let’s go.
The 11 steps to start a blog
- Clarify your blog topic
- Create your ideal reader avatar
- Pick a blog name/purchase url.
- Choose a great blog platform/get hosting.
- Set up a blog on your own domain
- Design your new blog
- Set up main pages
- Customise your blog. Choose a free template and tweak it.
- Write & publish your first post. The fun part!
- Promote your blog and increase your readership
- Monetise your blog.
Don’t worry we’re going to go one step at a time, I’ve got you.
Before we jump in I want to clarify something. It’s totally possible to start a blog for free over at wordpress.com, but I wouldn’t recommend it for a few reasons;
- You won’t have all the features. When you first get started you might not even know what the features are and it might seem irrelevant, but as soon as you get stuck in you’ll want to add things like Plugins and you won’t be able to.
- Lack of technical support. As you are on WordPress’ free platform you won’t be able to rely on a specialist support should something go wrong.
- Switching to self-hosted WordPress might not be easy for you to do yourself. So in the future when you want to move to self-hosted you may have to pay someone to do it for you.
- You will only have access to limited designs/themes.
- You look more legit and like you’re in it for the long haul which is more appealing to collaborators and your audience.
- Limited monetisation options. Some free services limit monetisation unless you pay to “upgrade” to a higher level.
With all this in mind my best advice is to start with WordPress.org.
Step 1: Decide on your niche
What do you want to blog about? What value do you want to offer? What do you do well? How are you going to stand out?
A huge mistake people make it that they try to appeal to as many people as possible and all this does is make them too general. This is a super competitive place to be and in order to stand out against all that competition you are going to have to go the extra mile.
It’s important to blog about something you enjoy, otherwise you won’t be able to write with sufficient passion to attract an audience.
Also choose a niche in which you’re knowledgable or can learn, in order to establish yourself as an authority. The goal for any blogger is to become the go-to resource for a specific topic.
For example, think about teaching Marketing. It’s a huge area with so many sub topics falling under this umbrella and so many potential customers. Think now about online marketing (the pool got smaller), online marketing for female creatives (smaller still) and finally Facebook ads for creative female entrepreneurs (the smallest yet, but if this is who your dream customers are they will be able to find you).
How can you be more specific to narrow your niche and start speaking to the people who are best suited for your message?
FURTHER READING: How to narrow your niche
Step 2: Create your idea reader avatar
Just as we do with niche, people always try to go broad on their ideal reader. ‘My blog is for women’ I often hear….. Is it? Really? I’m a woman, my 20 year old friend is and my 75 year old mum is too… The same tone/message/content will not appeal to all of us.
You need to create an avatar (persona) of your ideal reader. How old are they? Are they married? Have kids? Do they work? Where do they hang out online? Who do they follow?
By creating a fully filled out profile means you will be able to write content specifically for that one person. Then all the people who share some of her characteristics will resonate with the content too. They will feel as if you’ve written the words specifically to them.
FURTHER READING: How to create your idea reader avatar.
3. Pick a blog name & purchase the url
So you’ve decided what you want to blog about. Now how on earth do you pick an name….
There are a couple of different things you are trying to achieve with the name of your blog. You want it to be descriptive, so that people straight away know what to expect. Or you could use your name either with or without a descriptive word. For example, AmyTreasure.com or Amytreasurefood.com.
Remember if all goes well you could be living with this name for years to come, so take time to get it right.
Once you have some blog name ideas you will need to purchase a domain name. The domain is basically the URL of your website.
As part of this process you will have to decide whether you want the url to end with .com, .co.uk or one of the slightly less popular options, such as .net, .co, .org.
A .com domain extension is preferable, but it might not be available.
You also need to make sure that when all the spaces are removed between words it doesn’t look odd or create an undesirable word!
Now that you’ve picked your blog name and decided on the extension you need to check whether anyone has already registered the url.
Go into a domain name site of your choice (Google ‘domain names’, e.g https://www.names.co.uk). Then type in the url and see if it’s available. If it isn’t available then you could;
- Add a word. Words like “a”, “my”, or “the”. E.g. mamapreneurrevolution.com becomes themamapreneurrevolution.com
- Add dashes between words. E.g. mamapreneur-revolution.com
- Check a different domain extension. If the .com version is already registered you could try to get the .net, .co or .org version.
NOTE: You might want to hold fire purchasing your url until you do the next step. Often it’s possible to purchase the url with the hosting.
4. Choose a great blog platform & get hosting
Platform
You have to decide where you want to create your blog. There are a few options, but the most popular is WordPress. You could also pick Blogger or Squarespace, which are other popular options.
WordPress have more than 82 million active users of WordPress, which tells you a lot! The benefits of WordPress are plentiful;
- Hundreds of free themes and the option to purchase your own.
- Easy to use and the platform itself is free.
- Support forums in case you have any issues.
- It’s a great platform for sharing and commenting. Makes engagement easy!
- Useful plugins to make your blog even more functional.
What’s the difference between WordPress.com and WordPress.org?
As I mentioned earlier if you choose WordPress, you have two options: hosted or self-hosted.
- Hosted WordPress blogs (WordPress.com) are free but limit your income potential and are not as flexible or professional.
- Self-hosted WordPress blogs (WordPress.org) cost a small amount, but give you much more control, and do not limit your income potential.
I use and would only recommend wordpress.org.
Pick your hosting plan
Disclosure: I recommend using Lyrical Host for web hosting. If you click through one of my links and make a purchase, I will receive a small commission. I wouldn’t recommend anything I didn’t love..
Now you have your domain name, the next step to choose a hosting company that will get your blog online.
Lyrical Host are amazing. They don’t hide behind jargon and their customer service is exceptional. They also reduced my Siteground hosting fee by two thirds each month.
5. Set up a blog on your own domain
To get your blog online you need two things: hosting and blogging software. The good news is that these typically come packaged together.
A hosting company stores all of the files for your blog and keeps your blog online and accessible.
Hosting signup is fairly straightforward


Pick the option you need and click ‘order now’. Most people will be fine with the smallest accounts (in this case with Lyrical Host – Tiny). I have The Boss, but my main site is huge and I have 3 sites on this package.
Type in your desired domain name and check availability.
Select the extension you want to use and then scroll to the bottom and click continue.
If you already own a domain name click ‘Transfer your domain from another registrar’ type your existing domain in the box and then click “transfer”.

Next select the term you wish to sign up for from the drop down. 1 month up to 36 months. The longer you sign up for the more discount you get.

Enter all your invoicing details. You will need to check you have selected WordPress blog installation, web hosting, and branded email accounts (e.g. yourname@myshinynewblog.com) if you want email.
Then you will need to secure your account with a password. Choose a design template (you can change it later) and start the process of installing the WordPress software. The host site will guide you through the steps.
When this is complete you can start creating your blog structure, which we’ll talk about next.
N.B. You will have login details for your host (e.g. Lyrical Host) and for your blog.
All you now have to do to start blogging is go to your WP-Admin page usually www.myshinynewblog.com/wp-admin..
Activate your domain
When you bought your domain you will have been sent an activation email. You’ll need to click the link in this email to start the activation process.
If you have an existing domain then you will need to point your existing domain to your new site. You can find out all the details on this process here.
Secure your site
You may have noticed the https part of web urls. This used to be http and a while ago changed to https. Meaning that the site is secure. This gives people peace of mind when visiting your site and it’s also best practice.
When you have your domain and the registration is complete (just enter your domain url and if it forwards to a strange domain it is not yet complete. If this is the case wait a few more hours and come back to this task.
You need to activate an SSL certificate. Some hosting companies provide a free SSL certificate so check yours out and most will do the behind the scenes for you. Just make sure you know what you’re asking for, for an SSL certificate to be installed on your blog.
6. Get started with WordPress
In this step, we’ll get familiar with WordPress and configure some important settings.
Once you’ve opened WordPress, you’ll see your Dashboard. The black column on the left is a good indicator you’re in WordPress. It will look something like this:

From this dashboard, you’ll publish your blog posts and manage all aspects of your blog..
Configure the settings
Change your username from admin. I recommend you change your username. It’s likely to be “admin” which is open to hackers.
To change it, go to Users > All Users.
Are any of the usernames admin?
If you don’t see admin in the list, you need not change anything. If you do, you’ll want to remove it.
N.B: If you have published posts or pages created under the admin username you will need to attribute all posts and links to a new user before deleting.
To remove the admin username, you need to go to Users > All Users and hover over the admin username. If you see the delete option, then you can delete. If you don’t it probably means you’re logged in as admin. So you need to log in as an Administrator under a different user and then you will delete the general admin username.
Add a new user by clicking “Add New” under “All Users” in the left column OR by clicking the button at the top of the page. Next, fill out the new user information:
- Enter a new username.
- Enter your email address. If you’re already using the email you wish to use in this new user, just use any and then when you’re done you can change it back.
- Enter a password
- Select the “Administrator” role from the dropdown menu next to “Role.”
- Click “Add New User”.
Log out of WordPress, by hovering over your admin username in the top right corner of your screen until you see the option to log out.
Then log back in using the new, non-admin user you just created.
Again go to Users > All Users and hover over the admin username in the list just like you did above. This time, a “Delete” link will appear as an option. Click “Delete.”
Now each time to log in you do so with your new username and password. Remember, if you changed the email address earlier to create the new user you now need to go into Users > All Users > hover over your new user > Edit > scroll down and change the email and then click Update User.
Change your site title & tagline
Start in your Dashboard, hover over Settings on the left side, then click General.

The title will most probably be your domain name and then just add your tagline into the tagline field. If you don’t have an official tagline just add a short phrase that describes your blog.
Leave the urls as they are, but you can add an email address and select your time zone.
Delete the default content
There will be some content and other bits and bobs that as pre-loaded onto your site. It’s best to remove these before you create content.
- The “Hello World!” post – Go to Posts > All Posts. Hover over the post title and click the “Trash” link.
- Sample Page – Go to Pages > All Pages. Hover over the page title and click the “Trash” link.
- Unnecessary plugins – Go to Plugins > Installed Plugins. If there is anything in that list you don’t think you will use deactivate then delete it. Hover over the plugin you want to get rid of and choose “Deactivate” then repeat the process to see the “Delete” link.
I would recommend installing an antispam plugin – I use Anti-spam and SEO plugin, I use Yoast. Another of my favourites is the WordPress Editorial Calendar plugin, but it’s up to you if you want to install that one.
To install plugins, go to Plugins > Add New. Search for the name of a plugin you’re looking for. Find it in the list and click “Install Now.”

You will then need to activate the plugin. Go to Plugins > Installed Plugins. Find the plugin and then click “Activate”. You may have to configure the settings in the plugin (depending on which plugin it is). You can tell if you need to configure settings by going to Plugins > Installed Plugins and looking for a Settings link under the plugin name. Also, you might see a plugin listed on the left column of your Dashboard.
If you don’t see the plugin listed, you will need to Google the plugin then download the file on the official plugin site. Then Click ‘Add New’ in the plugin section of your WordPress dashboard, select the plugin and install. Then you will need to activate it and potentially configure.
- 4. The Meta widget – Go to Appearance > Widgets in the black left column of the Dashboard. Find the “Meta” widget box on the right side of the screen, expand its box by clicking the tiny down arrow and click the delete link.
Publish your main pages
Now it’s time to create the structure of your blog. Your WordPress blog will be made up of Pages and Posts.
- Pages are the permanent or unchanging structure of your site. You don’t access Pages via your blog roll, but you will link to them in your menu bar, sidebar or footer. Common pages are; a contact page, an about me page, work with me, resources, etc. You can always add and remove pages so just get the basics in place.
- Posts are individual articles on specific topics. For example, if you have a fashion blog maybe one of your posts would be ‘7 perfect accessories for summer’.
Let’s set up the pages!
These are the basic pages you need to start with;
- Home page
- About page
- Blog page
- Contact page
- Work with me
- Privacy policy page
- Disclaimer
- Other pages (if applicable)
Home page
Homepage styles can vary. There’s the traditional ‘blog’ homepage where all the posts (or excerpts) take up most of the page, usually with a sidebar. Or there are “static” homepages. A static homepage usually provides an overview of the site and includes a link to the blog (where the posts are listed), as well as links to other parts of the site.
Or you may have a combination (which is what I have) where you have a static homepage with the top few posts being fed through to one section.
If you’re not sure which style your blog is, when you’re in your dashboard hover over the house icon in the top left of the screen and then click “Visit Site.” You can then see your homepage as a reader would and can check it out.
If you want to change to a static page, you will first have to create the page you want to be your homepage. Go to Pages > Add New.
Then give your page a title. This title will show up at the top of your homepage,
Then add the content you want to show on your homepage. When you’re finished, just click the Publish button in the top right of your screen.
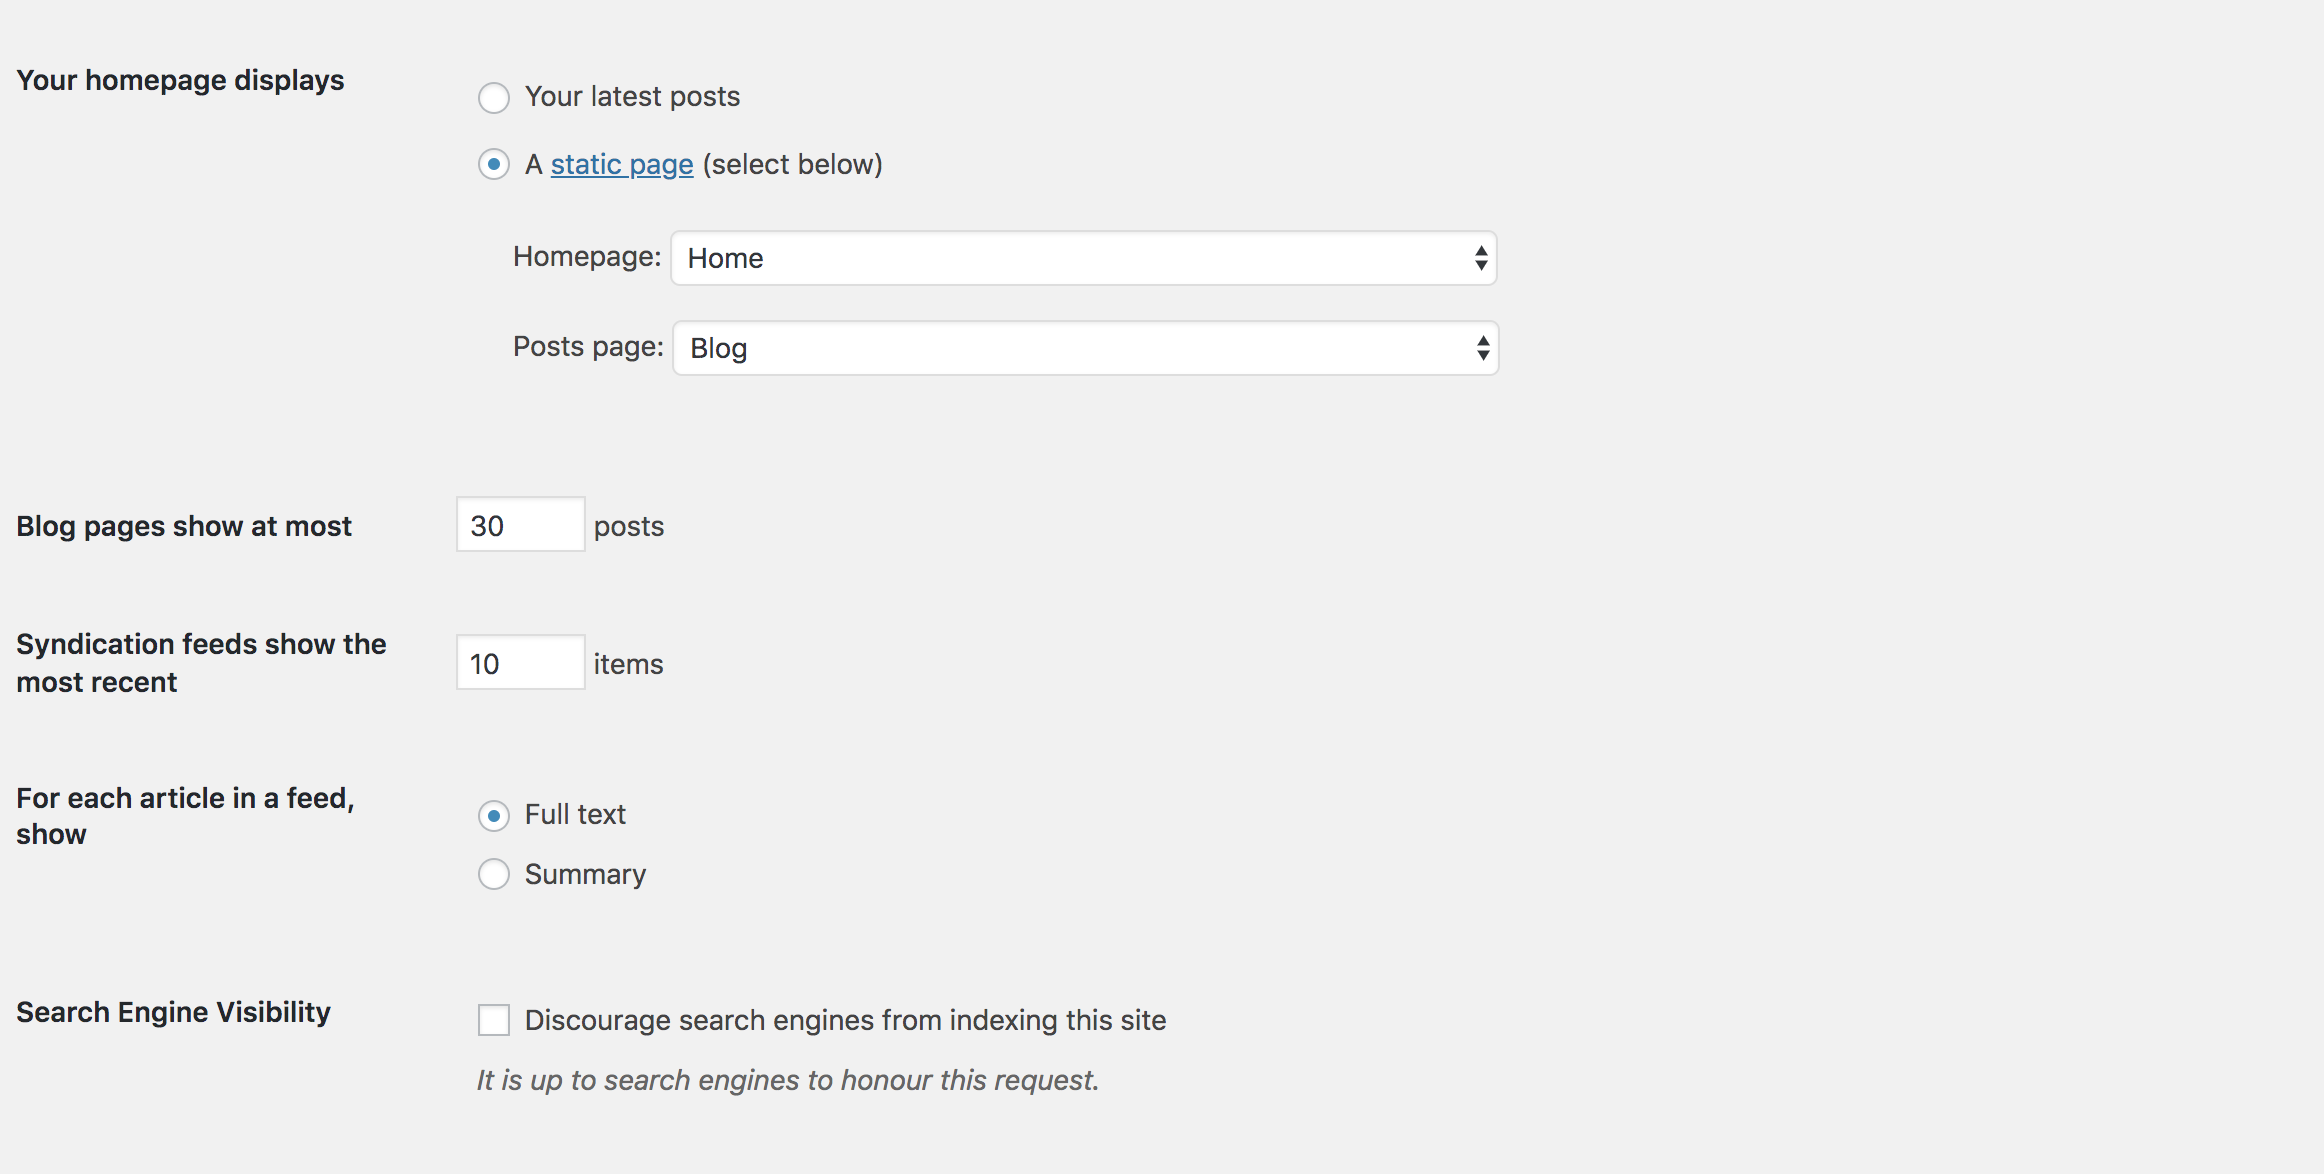
Now go to Settings > Reading. Under “Your homepage displays” choose “A static page” button and select the page you just created from the drop-down menu.
Save your changes.
Visit your homepage again to make sure it all looks fine.
Now to create your blog post page.
Go to Pages > Add New. Name this page Blog or Blog Posts. Don’t add any content the post window section. Publish.
Now go to Settings > Reading. Under “Your homepage displays” > “A static page” pick the blog post page you’ve created.
About Me page
Your About Me page is one of the most visited pages. It’s can also be one of the main places a reader will connect with you and turn into a fan. So it’s important to get this right. I have an awesome workbook guide, which will help you create a fabulous About Me page – you can grab it here – The About Page Advantage.
I also have written a detailed post on creating this important page.
In a nutshell this page is more about your ideal reader/customer than it is about you. Yes, you are telling them who you are and what you do, but framing it all in terms of how this benefits them. You need to tell them why they are in the right place and why they should stick around.
If you have an opt in freebie put it on this page and think of where to send them next – include the link.
Contact page
The contact me page is just a mechanism for providing people with all the different ways to contact you in one handy place. Email and social link need to be add (all clickable!).
Disclaimer page
When you make money, you must have a disclosure policy. You can use a disclosure policy generator like this one to create this page when you’re ready.
Privacy Policy page
You can find more information on setting up a privacy policy by going to Settings > Privacy. You can use the drafted page already set up for you as a template or you can use a generator like this one or this one.
Other Pages
The following are additional pages you might consider creating;
- Resources page. A resource page is a great way to help your audience with recommendations and also to add affiliate income to your business.
- Email opt in page. This is the page via which people join your email list. Usually they request a freebie by adding their email to this page and the fee content gets sent to them.
- Thank you page. This is the page the person will be redirected to when they sign yo to your email list. You can use this page to direct them elsewhere – Maybe to follow you on another platform or to join your Facebook group.
Writing your first post
You now have the structure of your site set up so you can start writing your posts.
What should your first post be about?
Most people ease into blogging with a wishy-washy, ‘this is why I’ve started a blog’ first post. But think about it who does that help? I think it would be much more beneficial to start as you mean to go on, with a bang.
Imagine your first blog post to be the start of a new novel. You’d want to hook and intrigue the reader. You want them to enjoy it, get value from it and most of all be encouraged to come back. Your first blog post should do the same.
I recommend having at least 5 posts written and published when you launch. This means people will have enough to get stuck into and by the time they finished you will have created something else for them.
If you’re still struggling with what to write, think of how you’re trying to help. How you can help them? Then Google those words and see what comes up.
You can also use answerthepublic.com to find questions people are searching the internet for the answers to.
How to create a new post
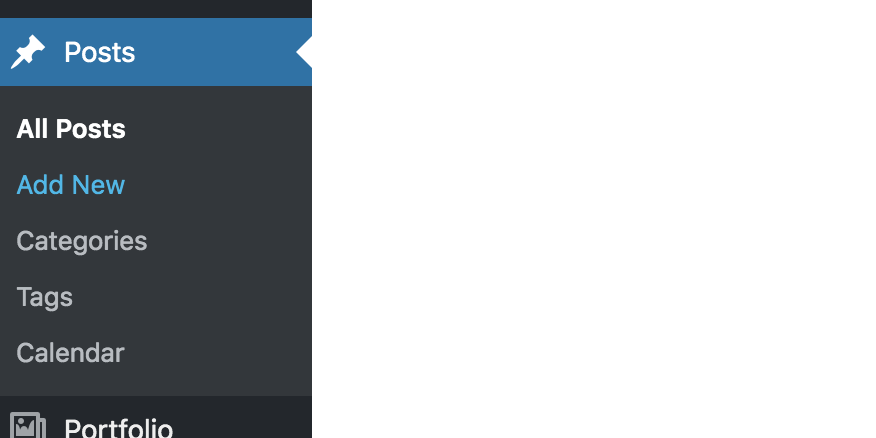
When you’re in your Dashboard you can add a post in two different ways. You can hover over the +New in the top bar of your screen, then select post. Or you can click on posts in the left hand column, then select Add New

or……
Gutenberg is an 2018 update to WordPress that makes writing posts easier and more streamlined.
Each Gutenberg block accommodate certain type of information. For example, you can use an image a text block to add text, an image block to insert images or a file block to insert PDFs.

You can create posts and pages that look exactly how you want as each block has its own styling options.
Add a post title
Think of what people would be typing into Google if they wanted to find what you’d written about. You can go way deeper with this and check out my post on Keyword research here.
Writing your post
You may choose to write in WordPress directly however, WordPress with save a version of your post regularly as you are creating it, so you will be adding bulk to your site behind the scenes. Also it has been known for WordPress to crash or your internet to go down and the post is lost. So it might be advisable to create the post elsewhere and then copy it over to WordPress when it’s finished. I use Google docs.
Add your images
When you want to add something other than regular text put your cursor where you want the new element to go and add a block by clicking the + icon.

The post permalink
Before you publish your post you might want to check the permalink. The permalink is drawn from your title. If your title includes words that aren’t keywords you might want to remove them, so you’re left with a shorter permalink including just the keywords. Shorter urls are better for SEO.
If you want to change the permalink structure of a post or page. Simply click the “Edit” button next to the automatically generated permalink on your post or page and change it to what you want.

Changing the permalink structure for all posts
For example if your urls all currently have dates in them and you want to remove them. Go to Settings > Permalinks page and choose your new URL structure. Avoid having dates in your url as this makes content seem old, even when it is still valuable.

Add a link to a post
Highlight the text you want to link from (anchor text) and click the link icon (it looks like a chain link) in the formatting box. A popup will appear and you can paste the URL of the page you want to link to. To set the link to open in a new window, click the 3 dots and toggle the switch.

Select the relevant category/ies and tag/s
On the right side of your screen under the permalink section, you can select or add new categories and tags to your post. If you can’t see this on the right click Document at the top of the panel.
Categories are the general topics on your blog. Aim for around 5-7 categories. They create a basic structure or “outline” for your content and can help the reader flow from post to post.
You can drill down into your content more and get more specific by using Tags, but not everyone who blogs uses tags. It’s up to you. If you do you need to make sure you keep everything organised.
Preview
When you’ve finished writing you can preview the post to double check everything looks ok. Hit the Preview button in the top right of your screen.
Save as draft, schedule or publish your post
As mentioned WordPress will autosave every few minutes. If you want to keep a post in Draft mode. You can access it by going to Posts > All Posts.
If you want to share it right away make sure ‘immediately’ shows up in the Status & Visibility box. Then hit publish.
To schedule it to go live at a later date, click “Immediately” next to Publish and choose the day and time you want it to go live. Then click Schedule.
NOTE: Don’t forget to set your timezone first (Settings > General).
Other Post visibility options
You can make your post public, private or password protected. Choosing Public is what you normally would pick. Private keeps it accessible to only site admins and editors. Password protected means people will have to enter a password before they can access the post.
Customise the design to suit your brand
Customising the design of your site isn’t a one and done task. You might find yourself tweaking things regularly. So don’t panic about getting everything perfect.
The design elements are based on what’s called a theme. A theme is a specific template that you can tweak. Some themes let you tweak more than others. It’s also worth thinking about your skill level and if you’re not super confident then maybe selecting a theme which is pretty much what you want and therefore requires less adjustment would be the way forward.
You need to make sure your chosen theme is functional and mobile responsive. A good place to start is by finding a site you like the look of and seeing what theme it is, you can usually see by scrolling down to the footer or simply message the blogger and ask.
You need to decide how you want things to be structured and work for your ideal customer and find a theme which delivers that. All colours can be changed so don’t let that sway your decision.
Where to find a WordPress theme
I use and recommend X theme as you can pretty much use it to create any site you want. It is so flexible. While this is brilliant for people who have a clear idea of what they want to put where. It might be more challenging for people who don’t really have a clear picture of the layout they want. In this case a more prescriptive theme that just needs tweaking maybe the best bet.
You can find great WordPress themes from BluChic and Creative Market (both affiliate links). There are also some basic themes preloaded in your WordPress dashboard. Go to Appearance > Themes. And you can activate the ones you see there.
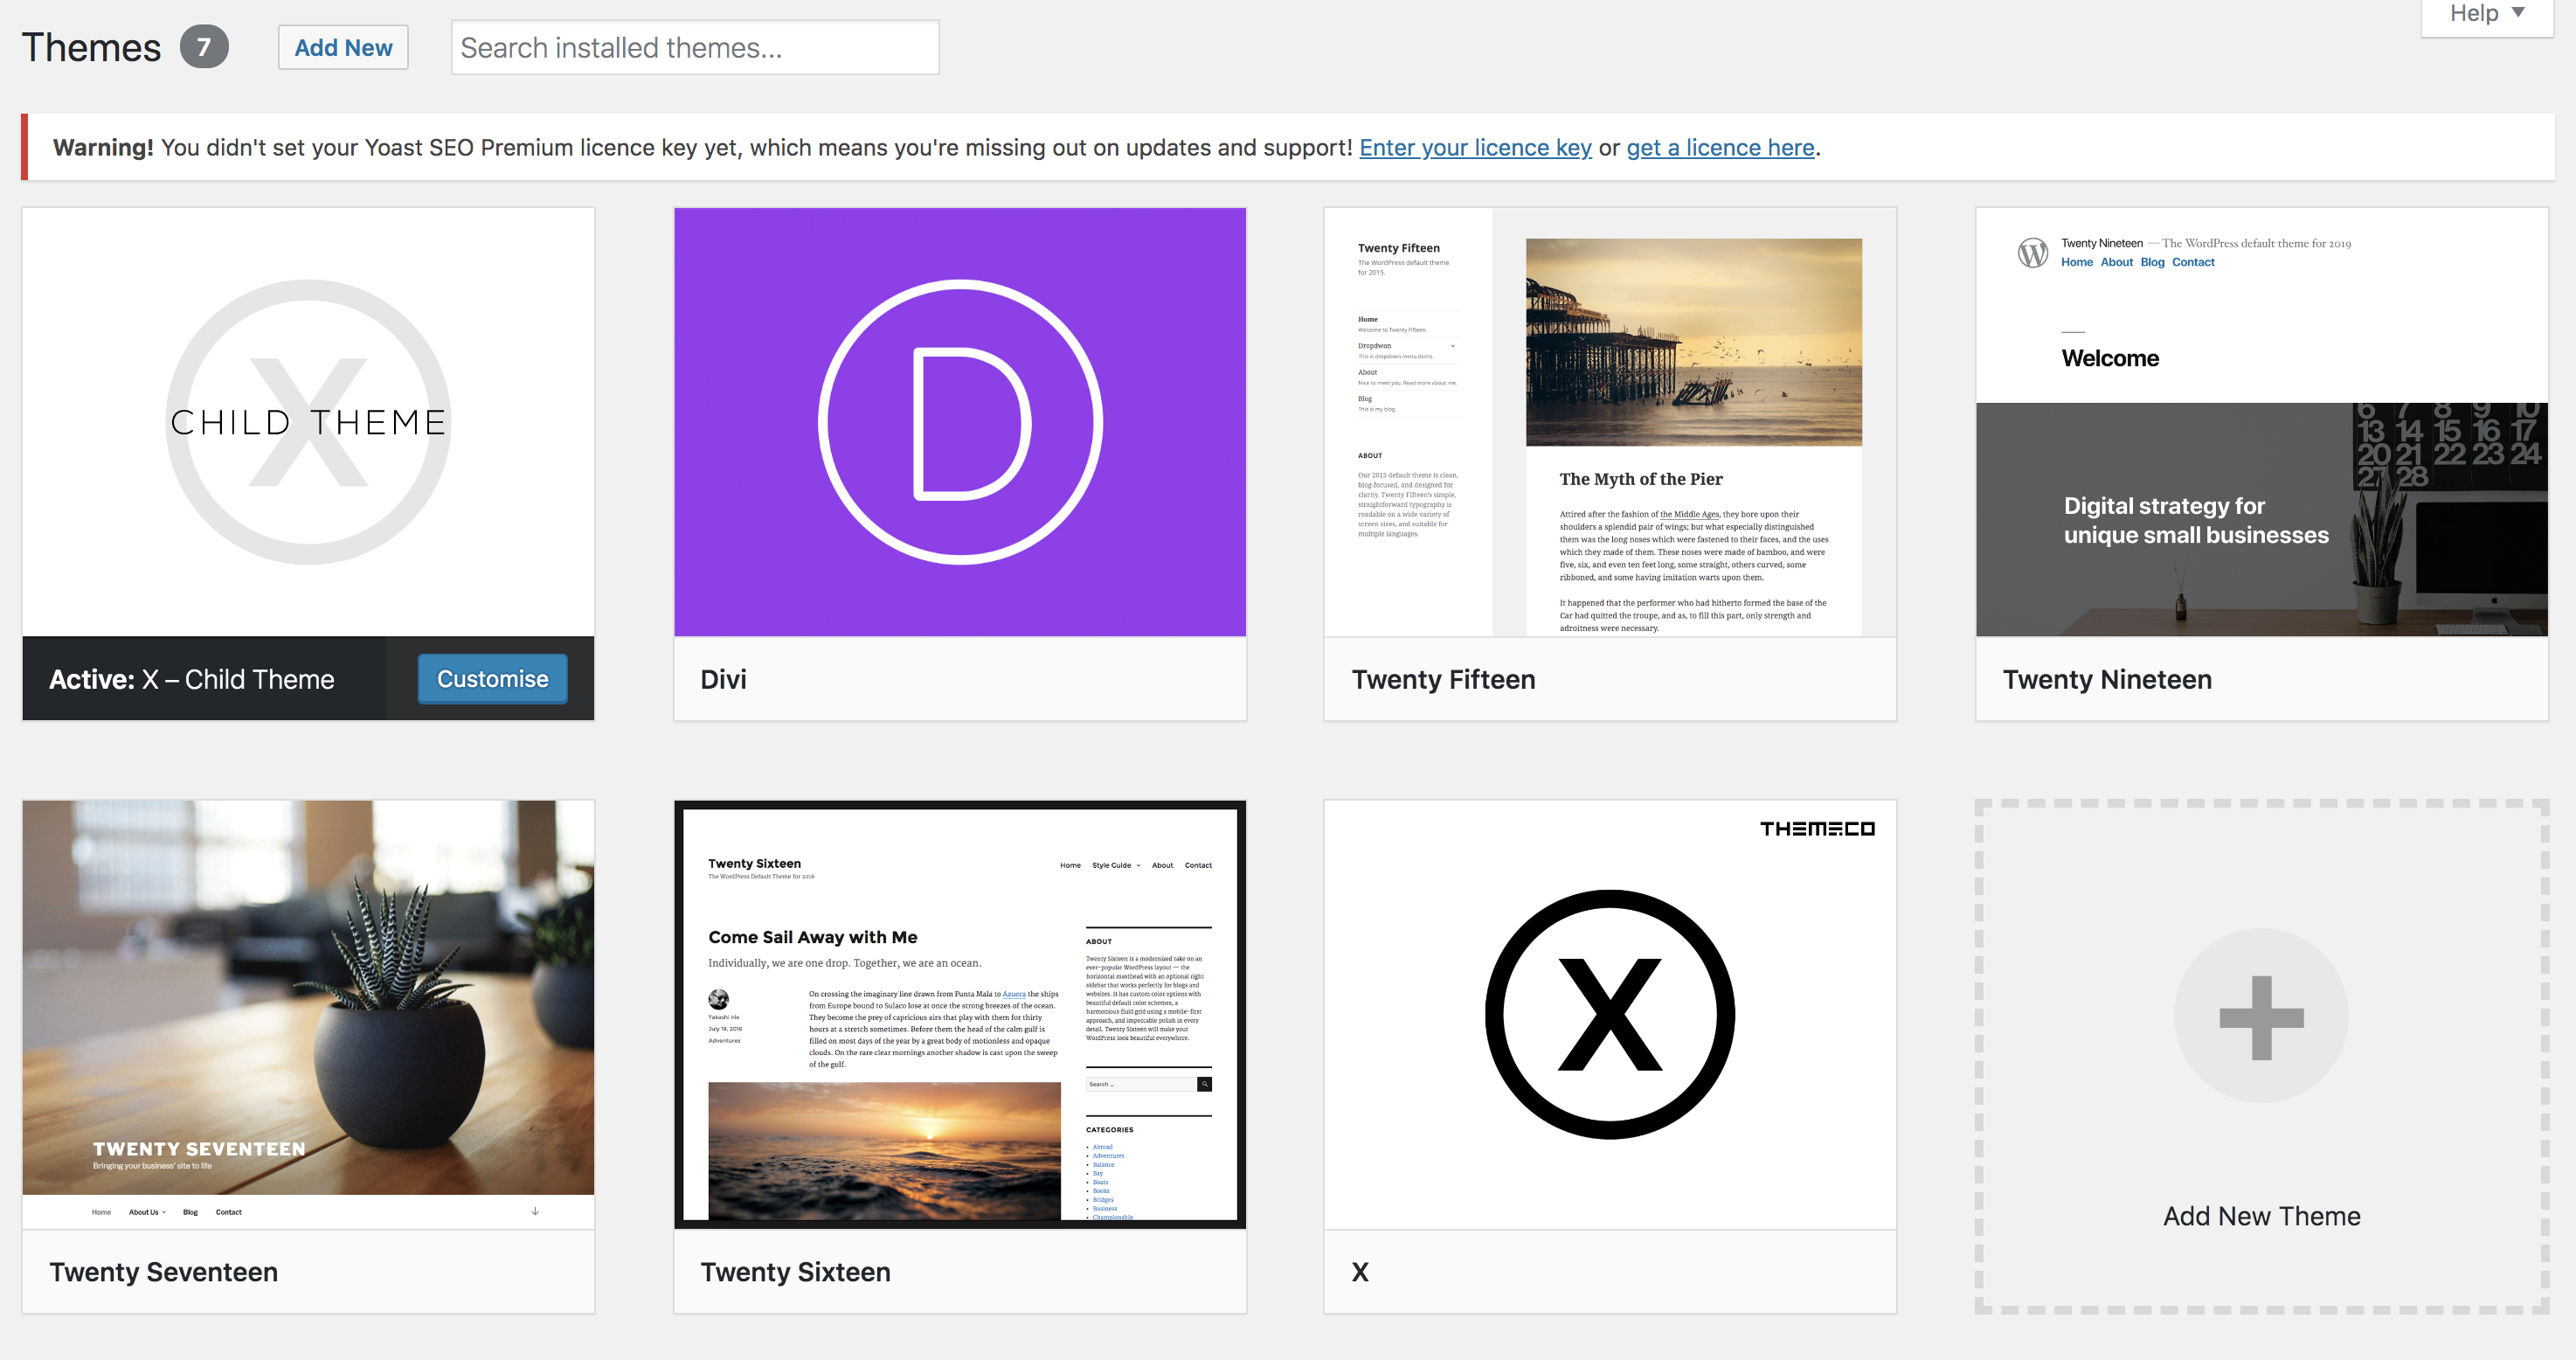
If you choose to buy a theme. When you find a theme you want, just go ahead and purchase it. You will be able to download the theme in a zipped (compressed) file. You will upload the zipped file, so if you accidently unzip it or your computer does it automatically you will need to right click and select ‘compress’ to zip it again.
Then in your WordPress Dashboard, go to Appearance > Themes > Add New > Upload Theme. Find your new zipped file and upload it.
Some themes have two components ; a main theme framework and a child theme. If this is the case with yours then complete the process for the main theme, then do exactly the same for the child theme. You will then only activate the child theme. To activate the new theme, go to Appearance > Themes. Hover over the theme you want and click Activate.
NOTE: Having a child theme means that you can update the main theme functionality without losing all of the additions, customisations and alterations you’ve made on the Child theme.
Customising your theme
To make changes go to Appearance > Customise. When in the Customiser you can change colour, fonts etc. What you can change will vary theme to theme.
Set up menus

Menus provide visitors with a way to navigate your site. Go to Appearance > Menus. The menu options you have will depend on your theme, but there should be information with your theme to tell you how to set them up. Usually any pages you add appear on the left side. You can then click the box and select ‘Add to menu’ and they will then appear on the right. You can then drag and drop them in place. When you view your site you will see them on the menu bar.
Set up widgets
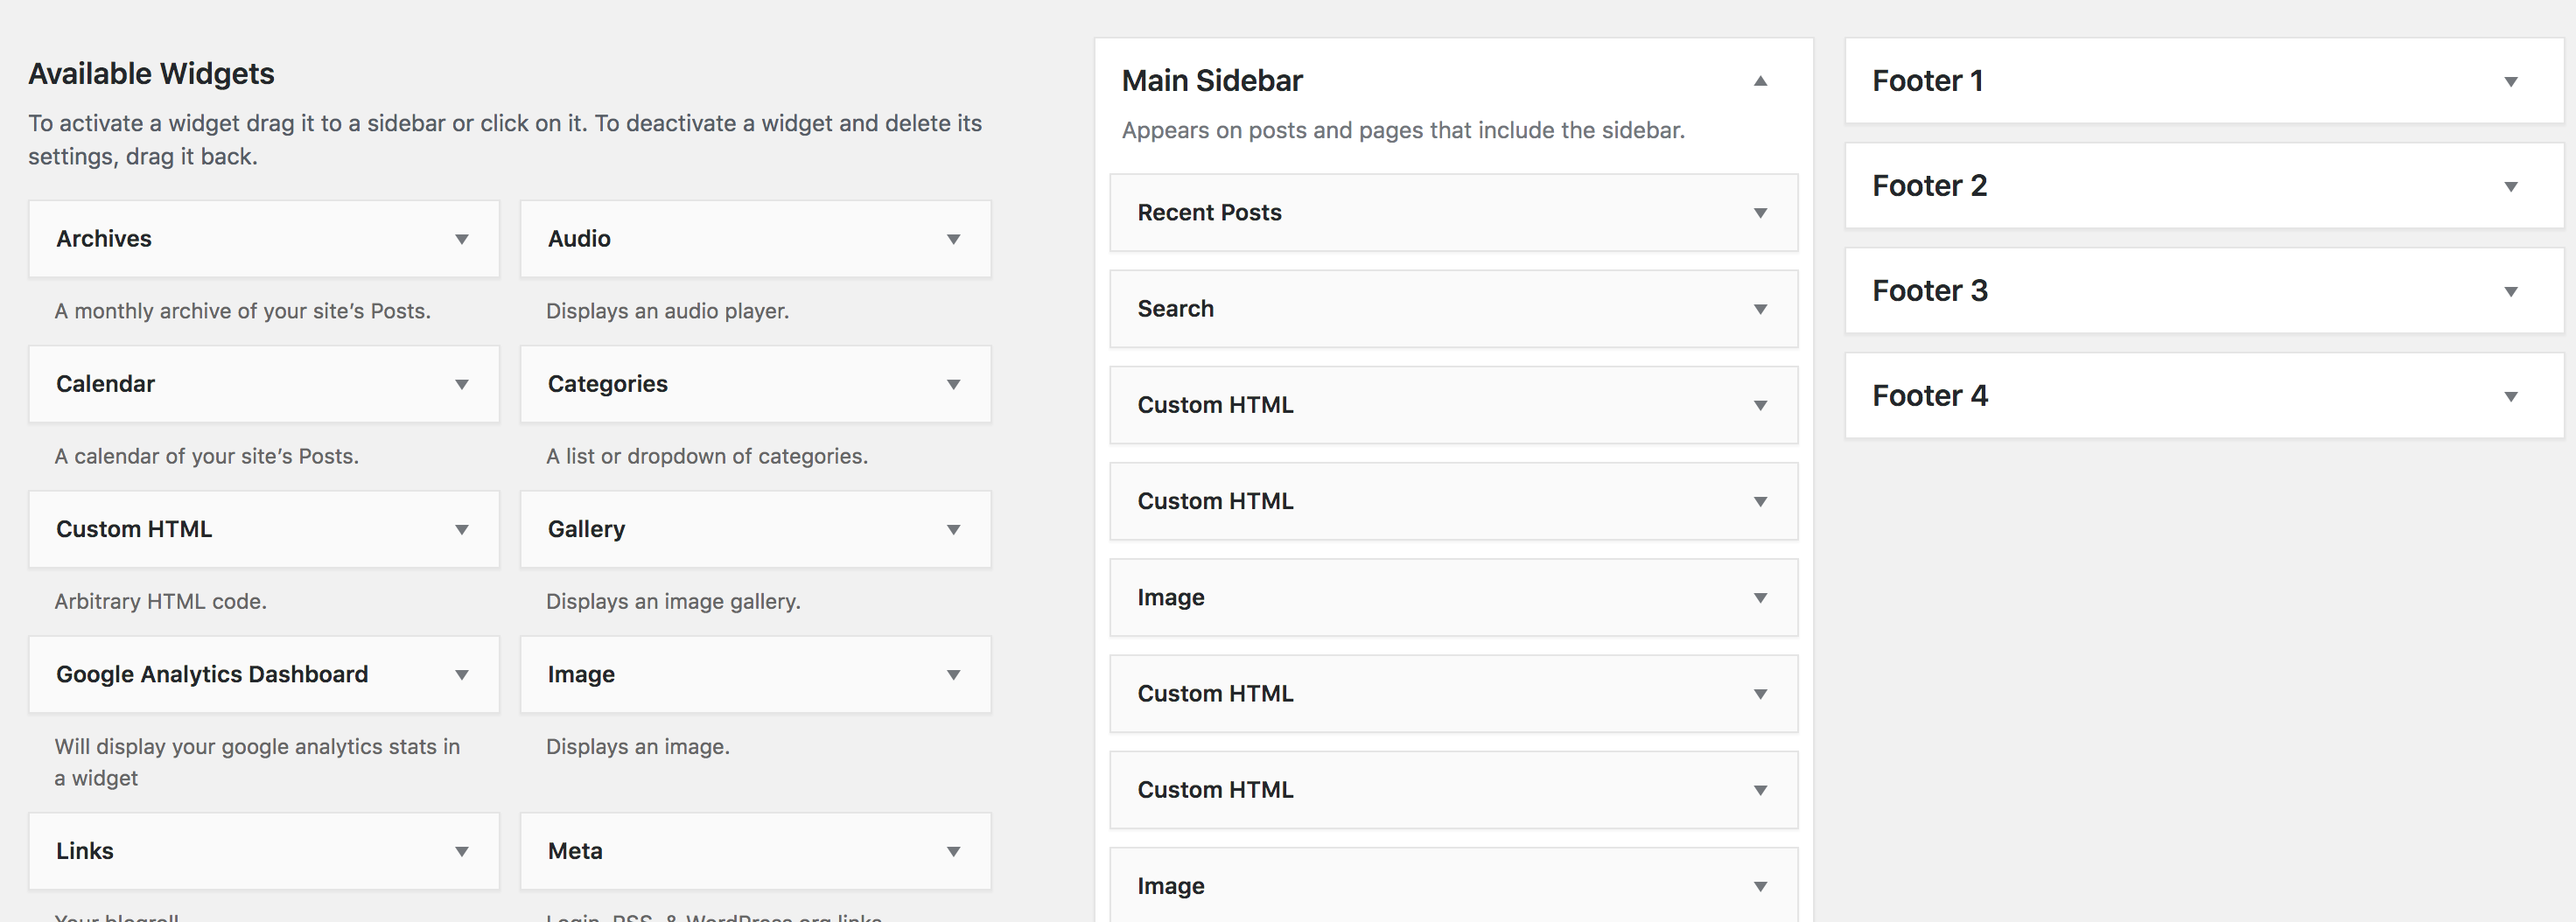
Widgets are the clever apps that make it easy for you to place different information in your footer, sidebar and other places on your site. Go to Appearance > Widgets. You can then drag and drop widgets from the left side of the page to the sidebars and footer sections on the right side. Edit the content in each via the drop down arrow.
It can seem like a huge task, but there are quite a few intuitive parts to this process. The only way you’ll learn is to get stuck in and remember pretty much everything can be altered anyway should you take a wrong turn.
If you follow the information in this post step by step you’ll have your very own blog set up and ready to go in no time at all.
I hope this post was helpful. I’d love to know the biggest struggles you have when it comes to starting your own blog?
